
Learn easy, creative, and proven techniques for painting plastic pumpkins, from surface prep and paints to sealing and display tips for long-lasting fall décor.
Introduction:
Painting plastic pumpkins is one of the easiest and most creative ways to bring festive Halloween or autumn décor to life. Unlike real pumpkins, plastic ones are durable, reusable, and perfect for crafting, allowing you to experiment with colors, textures, and designs without worrying about rotting. With the right tools, paints, and preparation techniques, you can achieve a professional-looking finish that lasts for years. This guide covers everything from surface prepping, choosing the best paint types, to creative decorating ideas. By following these expert tips, you’ll learn how to turn ordinary plastic pumpkins into eye-catching, seasonal masterpieces.
Painting Techniques for Plastic Pumpkins
| Technique | Description & Tips | Recommended Tools/Materials |
|---|---|---|
| Spray Painting | Provides smooth, even coverage; ideal for base coats or bold solid colors. Apply multiple light coats 10–12 inches away to avoid drips. Works well for indoor/outdoor plastic pumpkins. | Spray paint, protective gloves, drop cloth |
| Brush Painting | Perfect for details, grooves, and layered designs. Use thin coats to avoid streaks. Techniques like stippling, blending, and layering create realistic and vibrant pumpkins. | Synthetic brushes, acrylic paints, palette |
| Dry Brushing | Adds texture, depth, and dimension. Brush along ridges or textured surfaces for enhanced details. Complements spray-painted base coats. | Dry brush, acrylic paints |
| Sharpie + Alcohol Watercolor Effect | Creative or abstract designs. Blend Sharpie marker lines with rubbing alcohol for vibrant, watercolor-like effects. Great for kids’ projects or artistic accents. | Sharpie markers, rubbing alcohol, dropper |
Why Choose Painting Plastic Pumpkins?
Painting plastic pumpkins is a creative, safe, and long-lasting way to enhance your Halloween décor and fall crafting projects. Here’s why they are a smart choice:
- Durable and Reusable: https://www.sumoftheirstories.com/blog/10-creative-ideas-for-old-plastic-or-foam-pumpkinsPlastic pumpkins are long-lasting, so your DIY pumpkin projects can be used for multiple seasons without rotting, cracking, or losing shape.
- Safe for Kids and Pets: Unlike carved pumpkins, painted plastic pumpkins are safe, providing a clean, mess-free crafting experience for everyone.
- Complete Creative Control: Painting plastic pumpkins lets you customize designs, from realistic pumpkin looks to bold Halloween themes or elegant autumn décor.
- Versatile Design Options: Experiment with different colors, textures, and paint techniques, including solid hues, glitter, metallic finishes, or patterned designs.
- Perfect for Any Setting: Ideal for indoor/outdoor seasonal displays, classrooms, community events, and festive décor projects.
With these benefits, painting plastic pumpkins becomes a fun, safe, and personalized way to elevate your seasonal decorations.
Materials You’ll Need for Painting Plastic Pumpkins
Getting started with painting plastic pumpkins requires the right tools, paints, and supplies to ensure smooth, long-lasting results. Having everything prepared makes your DIY pumpkin projects easier, more creative, and professional-looking.
Essential Tools:
- Plastic pumpkins: Available at craft stores, dollar stores, or online. Select smooth or textured surfaces depending on whether you want realistic pumpkins or stylized Halloween décor.
- Cleaning supplies: Mild soap, warm water, and a sponge or cloth to remove dust, oils, and residues, ensuring better paint adhesion.
- Sandpaper: Fine-grit (220–320) lightly roughens the surface, perfect for painting plastic pumpkins that last season after season.
- Painter’s tape: Ideal for creating stripes, geometric patterns, or custom designs.
- Drop cloth or newspaper: To protect your workspace from spills and stains.
- Brushes: Foam brushes for base coats and fine detail brushes for intricate designs.
Paint Options:
- Acrylic paints: Vibrant, durable colors ideal for detailed pumpkin painting techniques.
- Spray paints: Offer smooth, even coverage for base layers and quick projects.
- Chalk or enamel paints: Provide matte finishes, textured surfaces, or specialty effects.
Additional Supplies:
- Clear sealer: Matte, satin, or gloss to protect and preserve your painted pumpkin designs.
- Stencils, glitter, metallic paints, markers, ribbons: Optional for creative accents, seasonal décor, and personalized DIY pumpkin projects.
By having these materials ready, you set the stage for successful painting of plastic pumpkins while experimenting with colors, textures, finishes, and festive decorating ideas.

Sealing & Protection
| Step | Action & Tips | Recommended Materials |
|---|---|---|
| Prep for Sealing | Ensure paint is completely dry before applying sealer. | Dry painted plastic pumpkin |
| Apply Coats | Use two to three light coats, letting every layer dry completely before the next.Prevents peeling, chipping, or fading. | Clear acrylic spray (matte, satin, or glossy) |
| Outdoor Protection | Protects pumpkins from sunlight, rain, or moisture, ideal for porch or garden décor. | Outdoor-rated protective spray (optional) |
| Enhance Colors | Sealing makes colors more vibrant and gives a professional finish. | Clear sealer, optional glitter or metallic accents |
| Final Step | Ensure all surfaces are covered for long-lasting DIY pumpkin projects. | Drying area free from dust |
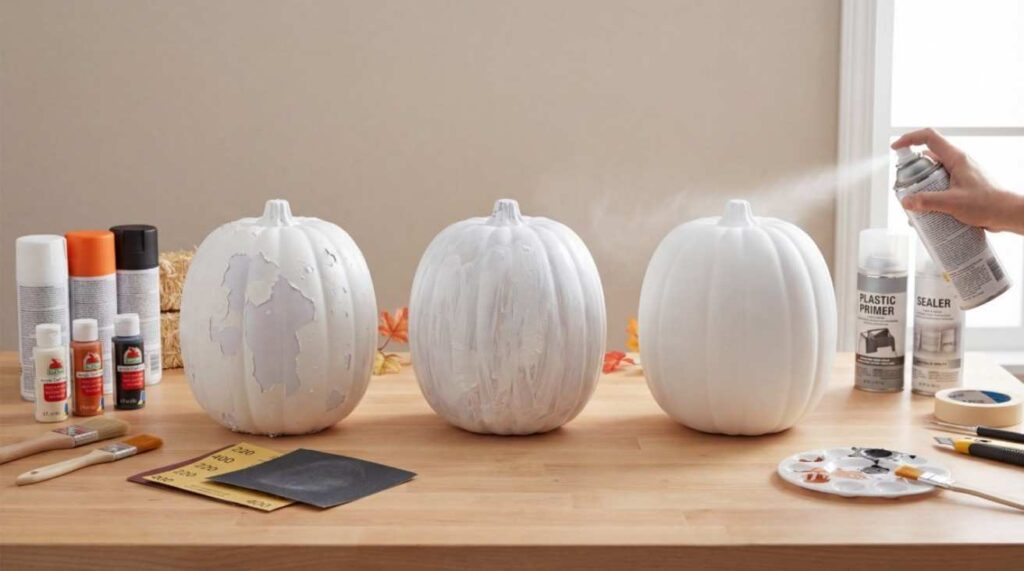
How to Prepare Plastic Pumpkins for Painting
Proper preparation is essential for painting plastic pumpkins. Skipping cleaning or sanding can cause paint to peel, chip, or fail to adhere, compromising your DIY pumpkin painting projects. Follow these expert steps to achieve smooth, vibrant, and long-lasting results for Halloween décor and fall crafts:
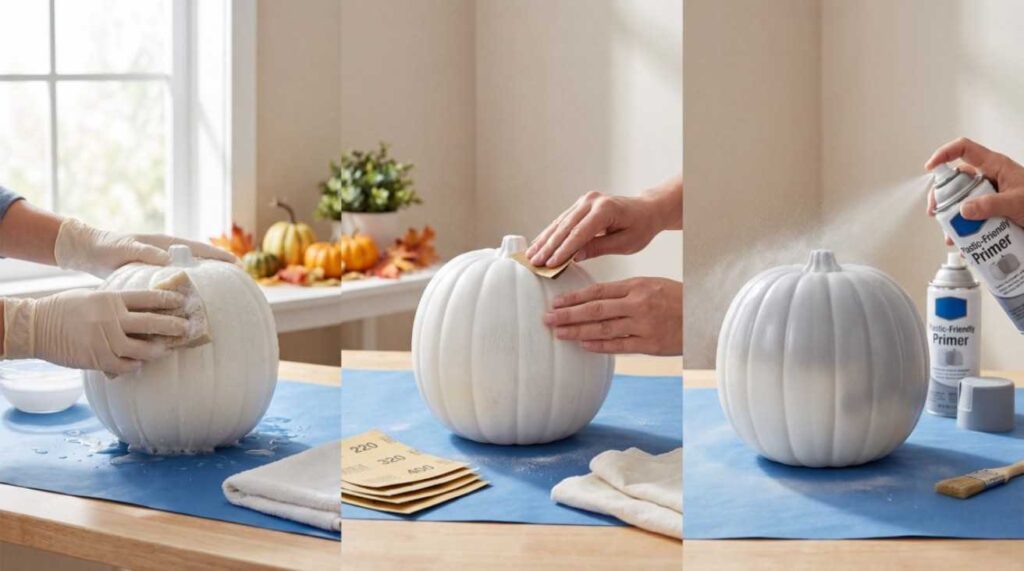
Step 1: Clean and Dry
- Wash your plastic pumpkins with mild soap and warm water to remove dust, dirt, and oils.
- Gently scrub with a sponge or soft cloth, ensuring all grooves and crevices are clean.
- Rinse thoroughly and let the pumpkin air dry completely.
Cleaning creates a pristine surface, ensuring acrylic paints, spray paints, or specialty finishes adhere properly and colors appear vibrant.
Step 2: Sand the Surface
- Lightly sand with fine-grit sandpaper (220–320 grit) to create a slightly textured surface for better paint adhesion.
- Focus on flat surfaces, grooves, and curves.
- Wipe off all dust with a dry cloth.
Sanding enhances pumpkin painting techniques, allowing for layered paints, glitter accents, metallic finishes, and detailed designs.
Step 3: Apply Primer (Optional but Recommended)
- Use a plastic-friendly primer to strengthen paint adhesion and ensure a professional, long-lasting finish.
- Apply a thin, even coat, covering all grooves and curves.
- Give the primer enough drying time by following the brand’s guidelines.
Priming guarantees your painting plastic pumpkins projects look vibrant and last season after season, perfect for creative DIY pumpkin projects and seasonal home décor.
Once prepped, your pumpkins are ready for painting plastic pumpkins with custom colors, textures, and festive designs, making your fall décor crafts stand out with creativity and durability.
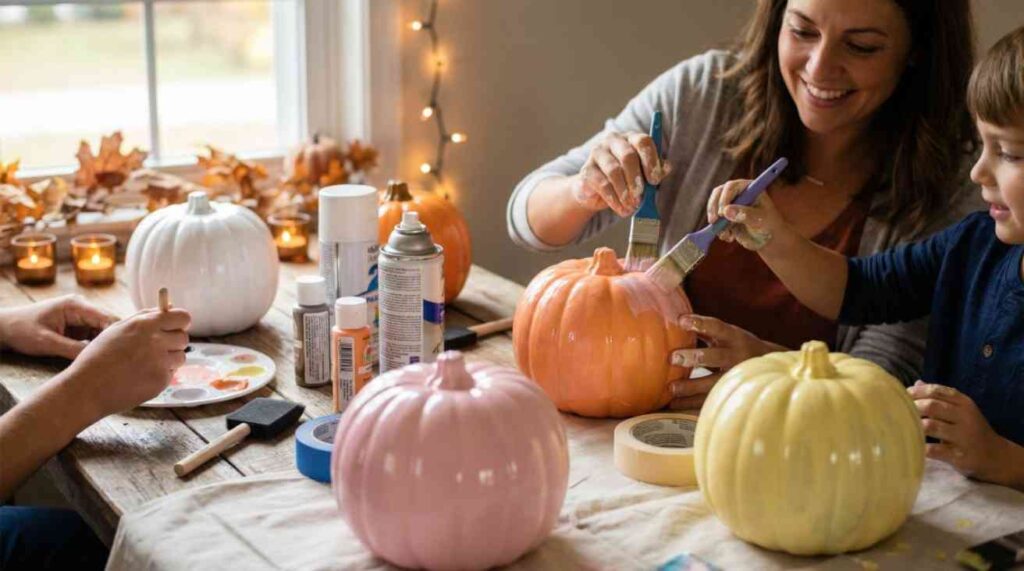
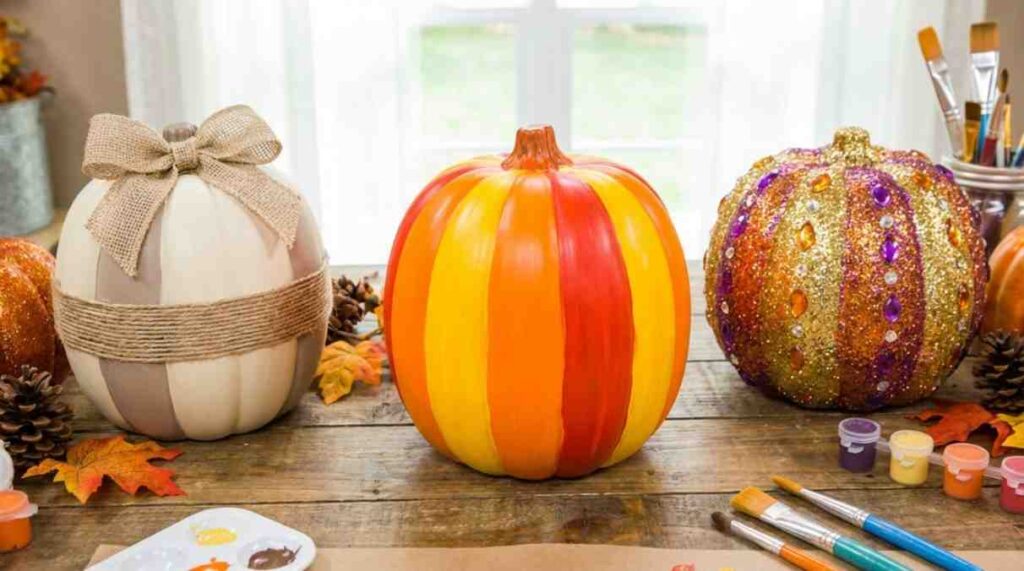
Creative Painting Ideas & Inspiration for Painting Plastic Pumpkins
When painting plastic pumpkins, the creative possibilities are virtually limitless. Transform ordinary plastic pumpkins into DIY pumpkin projects, festive pumpkin painting, and seasonal décor ideas that reflect your style—classic, spooky, or elegant.
Classic & Elegant Designs
- Solid colors such as white, black, metallics, or muted pastels create timeless and sophisticated décor.
- Painter’s tape can be used for stripes, geometric patterns, or simple shapes, achieving a polished, professional finish.
- Ideal for tabletop displays, minimalist fall décor, and elegant seasonal decorations.
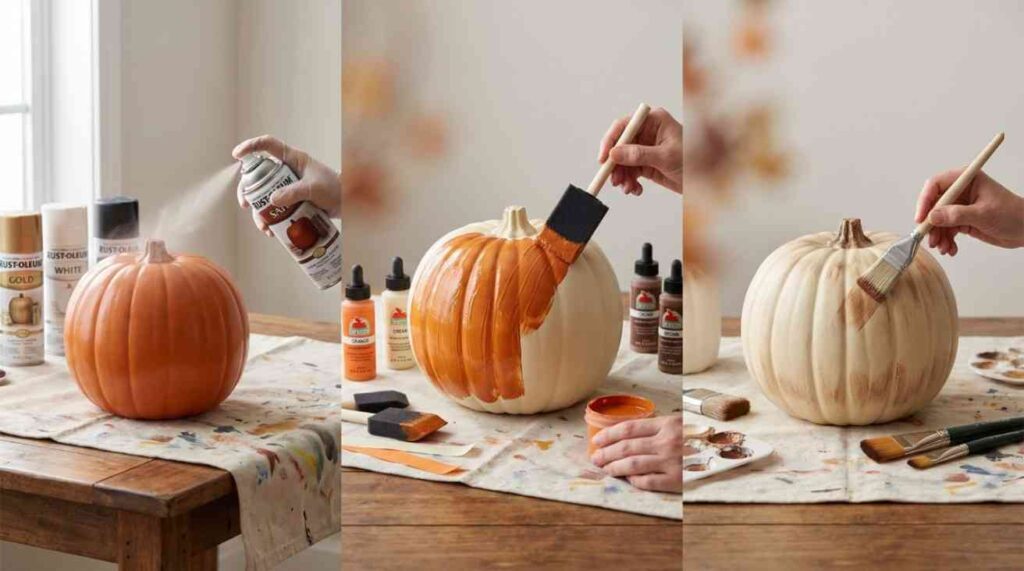
Realistic Faux Pumpkin Look
- Use base coats combined with dry brushing techniques to emphasize grooves and textured surfaces.
- Layer shades of orange, cream, and muted greens for depth, dimension, and realism.
- Makes plastic pumpkins look lifelike while remaining reusable for annual DIY pumpkin painting projects.
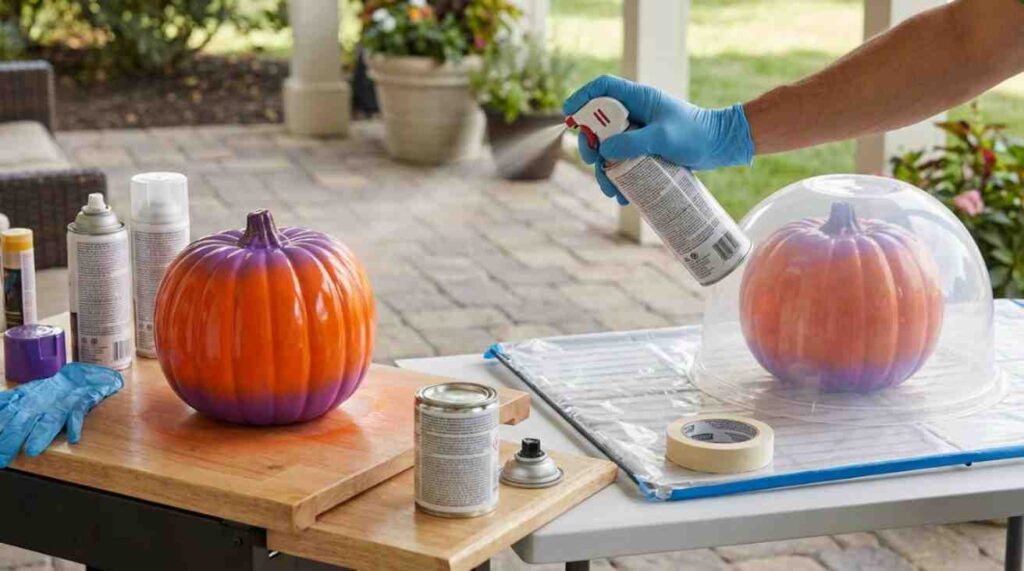
Fancy & Fun Finishes
- Glitter sprays, metallic paints, or decoupage add sparkle and sophistication.
- Sharpie watercolor techniques or abstract pumpkin designs allow playful experimentation.
- Perfect for kids’ crafts, creative pumpkin designs, Halloween décor, or unique home décor pumpkins.
By experimenting with colors, textures, and finishes, painting plastic pumpkins lets you create décor ranging from subtle elegance to bold, festive statements, producing memorable, one-of-a-kind seasonal decorations.

Seasonal Display Inspiration for Painting Plastic Pumpkins
| Display Idea | Setup / Arrangement | Recommended Accessories | Tips / Notes |
|---|---|---|---|
| Front Porch Clusters | Arrange pumpkins of varying sizes, colors, and textures | LED lights, fall foliage, glitter pumpkins, metallic finishes | Group creatively for a warm, festive outdoor display; painting plastic pumpkins ensures durability for multiple seasons |
| Table Centerpieces | Combine painted pumpkins with candles, seasonal flowers, or greenery | Candles, floral arrangements, greenery, tabletop pumpkins | Enhances fall table décor and home décor pumpkins; layering small and medium pumpkins adds dimension |
| Themed Arrangements | Use black, orange, or glittered pumpkins for Halloween, or neutral tones for farmhouse-style décor | Spooky props, neutral-colored pumpkins, glitter, metallic paints | Align pumpkins by theme or color palette to create cohesive seasonal decorations; painting plastic pumpkins allows reuse each year |
| Kids’ Craft Corners | Display smaller painted pumpkins in family or classroom DIY projects | Mini pumpkins, markers, glitter, stickers | Encourage creativity and hands-on fun; perfect for festive pumpkin displays and DIY pumpkin projects |
Step-by-Step Project Examples for Painting Plastic Pumpkins
Achieving professional results when painting plastic pumpkins is simple with clear, step-by-step project examples. These ideas are perfect for DIY pumpkin projects, festive pumpkin painting ideas, and seasonal décor inspiration:
1. Basic Painted Pumpkin
- Prep the pumpkin by cleaning and lightly sanding the surface for smooth paint adhesion.
- Apply a thin coat of primer to enhance color vibrancy.
- Spray or brush on a base coat in your chosen shade.
- Add details using brushes, stencils, or markers for personalized designs.
- Finish with a clear sealer to protect your work.
Ideal for beginners, this method produces a polished, reusable pumpkin decoration suitable for home décor pumpkins or tabletop pumpkin décor.
2. Farmhouse-Style Pumpkin
- Use a neutral base color such as white, cream, or soft gray.
- Highlight ridges and grooves using dry brushing or slightly darker shades.
- Add decorative accents like raffia, twine, or ribbon around the stem.
Creates a rustic, cozy aesthetic, perfect for tablescapes, porches, or farmhouse-style fall décor.
3. Glitter Pumpkin
- Apply a solid base coat.
- Spray or brush glitter for sparkling, festive effects.
- Seal with a clear protective finish to prevent flaking.
Glitter pumpkins add shimmer and whimsy, ideal for parties, seasonal displays, and creative DIY pumpkin projects.
These step-by-step project examples provide versatile DIY plastic pumpkin painting projects, offering creative inspiration for beginners and advanced crafters, and producing unique, long-lasting seasonal decorations.
Common Mistakes & Troubleshooting for Painting Plastic Pumpkins
| Common Mistake | Cause | Solution / Tip |
|---|---|---|
| Paint Peeling or Chipping | Pumpkin surface wasn’t properly cleaned, sanded, or primed | Prep the surface thoroughly before painting plastic pumpkins to ensure smooth DIY pumpkin projects and long-lasting pumpkin paint. |
| Uneven Coverage | Thick paint coats cause streaks or blotches | Apply multiple thin layers for even coverage, vibrant colors, and professional pumpkin finishes. |
| Drips & Runs | Spray paint applied too heavily | Hold the can 10–12 inches away and apply light, controlled coats to prevent drips and maintain festive seasonal decorations. |
| Color Fading | Exposure to direct sunlight or harsh weather | Seal pumpkins with a protective finish to preserve colors for glitter pumpkins, metallic finishes, and home décor pumpkins. |
FAQs: Painting Plastic Pumpkins
Q1: Do I need primer to paint plastic pumpkins?
A: Primer is highly recommended for best results when painting plastic pumpkins. It improves paint adhesion, ensures colors are bright and even, and prevents peeling over time, making your DIY pumpkin projects long-lasting.
Q2: What paints work best on plastic pumpkins?
A: Acrylic paints are perfect for detailed brushwork, while spray paints formulated for plastic provide smooth, even base coats. Chalk or enamel paints create specialty textures and metallic or glitter pumpkin finishes.
Q3: Can I paint plastic pumpkins indoors?
A: Yes, but ensure proper ventilation when using spray paints. Acrylics can be safely applied indoors for safe, creative pumpkin designs.
Q4: How can I make plastic pumpkins look realistic?
A: Use layered colors, dry brushing, and shading to mimic natural pumpkin textures and achieve realistic, professional-looking pumpkins.
Q5: How do I seal painted pumpkins for long-term use?
A: Apply 2–3 thin coats of clear acrylic sealer, letting each layer dry completely to protect long-lasting pumpkin paint, glitter pumpkins, and seasonal decorations.
Conclusion:
Painting plastic pumpkins is an easy, creative way to elevate your fall and Halloween décor. With proper surface preparation, the right paints, and versatile painting techniques, even beginners can achieve professional-looking results. Experimenting with colors, textures, and designs ensures your DIY plastic pumpkin painting projects become long-lasting, reusable, and uniquely personalized seasonal decorations, ideal for home décor pumpkins, glitter pumpkins, metallic finishes, and festive fall displays.


